
Welcome to my 5-part series of “5 Fantastic Tricks & Tips”. This series shows you some awesome tricks and tips for building your powerpoint presentations. Posts go up every Wednesday. You can also check out the replay on Katch.me or at the bottom of the post.
Today, I’ll show you a very under utilized tool know as the selection pane.
Just what is the selection pane? The selection pane displays all the objects on the current slide. Every object has a name, whether it’s a text box, shape, or photo.
The Selection Pane is not immediately displayed in powerpoint. To display the selection panel:
- select any object on the slide
- The “Drawing Tools” panel should appear at the top. Click on “Format”.
- Click on “Selection Pane.

Just what does the selection pane do? Aside from displaying the objects on a slide, it can help you manage your layers (who’s in front and who’s behind) and identifies/hides objects.

Did you know? You can name your objects? That’s right. Just double click on a shape in the selection pane and you can name your objects. This comes in handy when you have several objects on a page.

This helps when you make PPT Games! When you making buttons to move to the next slide, you can actually name them “Next” or “Previous” rather than “Picture 1” or “Picture 2”. This helps your you know when you use “triggers” in animations.
 |

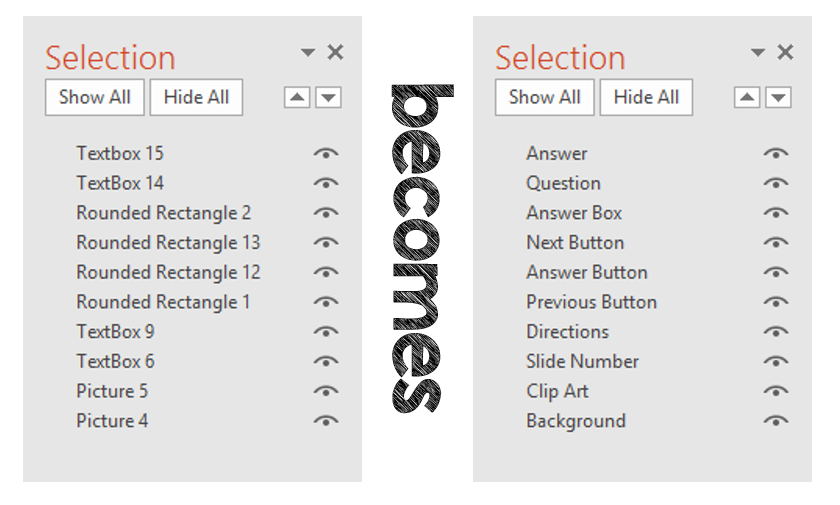
To name an object, open the selection pane, double click on an object on the pane and type your desired name.

One feature of the selection pane is to show or hide objects. This is useful when changing a powerpoint game to task cards. You can do so by clicking the “eye”. An open eye means the object is visible. A closed eye means it’s still there, but it is not visible. Perfect for hiding answers on games and printing them as task cards.

I hope these tips come in handy! They’re a big help when you create product covers, worksheets, games, and other teaching materials. Please share and comment if this was helpful!

This is AWESOME!!! Thank you for teaching me something 🙂
Julie
The Techie Teacher
This is AWESOME!!! Thank you for teaching me something 🙂
Julie
The Techie Teacher
Fabulous post! I'm such a visual learner, so the pictures and descriptions are super helpful. I know exactly what you're talking about now. Thanks!!!
Fabulous post! I'm such a visual learner, so the pictures and descriptions are super helpful. I know exactly what you're talking about now. Thanks!!!
Thanks…this is something I did not know at all! Worth the read and I'll be back. Sunshine and Lollipops
Thanks…this is something I did not know at all! Worth the read and I'll be back. Sunshine and Lollipops
Thank you so much for the great details! I will have to play around with this! I am just starting to make games with Powerpoint and I'm just learning as I go. It takes soooo long to teach yourself!! I appreciate the tips!!
Amy
Thank you so much for the great details! I will have to play around with this! I am just starting to make games with Powerpoint and I'm just learning as I go. It takes soooo long to teach yourself!! I appreciate the tips!!
Amy
Thank you so much for the great details! I will have to play around with this! I am just starting to make games with Powerpoint and I'm just learning as I go. It takes soooo long to teach yourself!! I appreciate the tips!!
Amy
Thank you so much for the great details! I will have to play around with this! I am just starting to make games with Powerpoint and I'm just learning as I go. It takes soooo long to teach yourself!! I appreciate the tips!!
Amy
Oh yes! It took me a while, but it gets easier as it goes on.
Oh yes! It took me a while, but it gets easier as it goes on.
This is great! Thanks! I'd forgotten all about that aspect of PowerPoint (and believe me, there are a few times I could have used it!!)
I was once a Certified PowerPoint epert user… but that was ages ago. LOL
Mme Aiello @ Teaching FSL
This is great! Thanks! I'd forgotten all about that aspect of PowerPoint (and believe me, there are a few times I could have used it!!)
I was once a Certified PowerPoint epert user… but that was ages ago. LOL
Mme Aiello @ Teaching FSL
^ *expert* Darn it! LOL
^ *expert* Darn it! LOL
Great tips! I love learning new ways to make creating activities quicker and more efficient. Thank you so much!
Great tips! I love learning new ways to make creating activities quicker and more efficient. Thank you so much!
Love these tips! All new information to me!
Love these tips! All new information to me!
Great tip! Thanks for sharing!
Great tip! Thanks for sharing!